Relying on your internet service provider's default DNS is often the hidden reason behind sluggish browsing speeds and blocked websites. By taking a few minutes to change your DNS settings, you can instantly upgrade your network's response time, enhance your privacy, and bypass regional restrictions. The Domain Name System (DNS) acts as the internet's directory, translating human-readable website names into IP addresses. While your ISP assigns one automatically, switching to a dedicated public DNS service ensures faster lookups and better security.
Top Public DNS Servers to Consider
Before modifying your network adapters, you need to select a reliable provider. You should always enter both a primary and a secondary DNS server so your connection has a fallback if the first one is unreachable.
- Select Cloudflare (1.1.1.1 / 1.0.0.1). This ensures maximum speed and privacy, as they do not sell your browsing data.
- Choose Google Public DNS (8.8.8.8 / 8.8.4.4). This enables highly reliable and fast connections with a long track record of uptime.
- Opt for Quad9 (9.9.9.9 / 149.112.112.112). This enables built-in malware protection by automatically blocking known malicious domains.
- Use OpenDNS (208.67.222.222 / 208.67.220.220). This provides phishing protection on the free tier and content filtering for families on the paid tier.
How to Change DNS Settings on Windows
DNS settings are configured per network adapter, meaning you can set different servers for your home Wi-Fi and your office Ethernet independently.
- Open the Control Panel and navigate to Network and Internet, then Network and Sharing Center. This enables access to your active network adapters.
- Click your active network adapter (Wi-Fi or Ethernet) and select the Properties button. This allows you to modify the core connection settings.
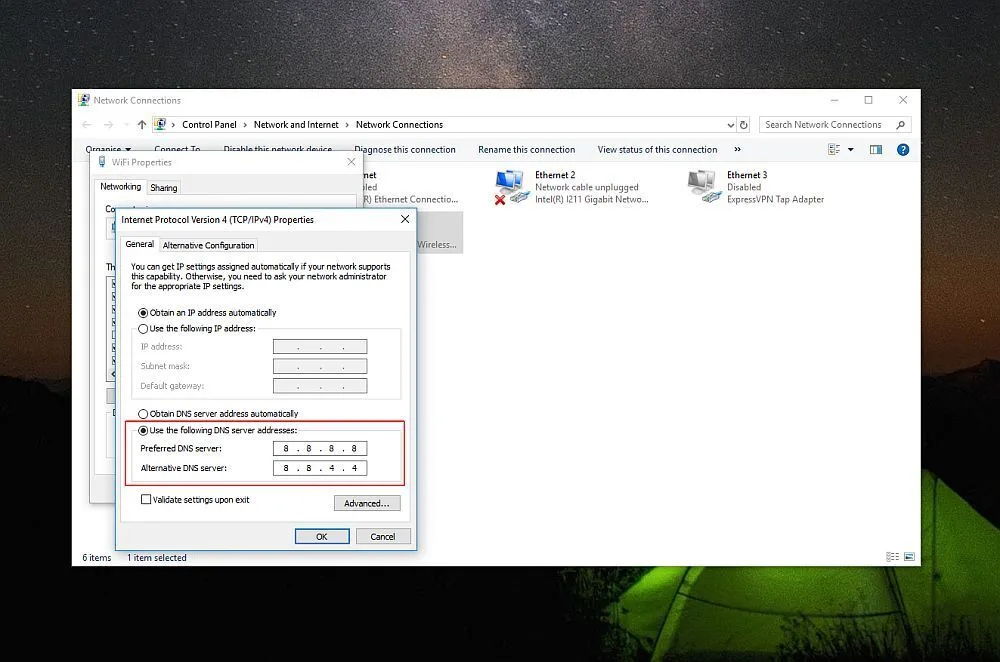
- Double-click Internet Protocol Version 4 (TCP/IPv4). This opens the specific protocol window where DNS addresses are stored.
- Select 'Use the following DNS server addresses' and enter your preferred primary and secondary IPs, then click OK. This ensures your system routes traffic through your chosen provider instead of the ISP default.
How to Change DNS Settings on macOS
The process varies slightly depending on your operating system version. macOS lets you configure several different DNS services, automatically falling back to the next one if the primary fails.
For macOS Ventura, Sonoma, and Sequoia:
- Open System Settings from the Apple menu and select Network. This provides access to your current connection profiles.
- Choose your active connection and click Details, then navigate to the DNS tab. This isolates the specific network interface you want to modify.
- Click the plus sign to add your preferred DNS server addresses and click OK. This saves your custom configuration to the system.
For macOS Monterey and earlier:
- Open System Preferences and go to the Network group. This opens the legacy network management interface.
- Select your active network, click Advanced, and go to the DNS tab. This reveals the manual entry fields for server addresses.
- Click the plus sign, enter your desired DNS IPs, and click OK to apply. This ensures your Mac uses the new servers immediately.
How to Change DNS Settings on Your Router
Changing DNS at the router level is the most convenient option if you want every device on your home network to use the same server without configuring each one individually.
- Type your router's admin IP address (commonly 192.168.1.1 or 192.168.0.1) into a browser. This enables access to the router's web-based configuration panel.
- Log in using your admin credentials. This authenticates your session to allow system-level changes.
- Locate the Internet, WAN, or DHCP Settings section. This is where network-wide routing rules are defined.
- Enter your chosen IPs into the Primary DNS and Secondary DNS fields, then save and reboot. This ensures every device connected to your home network automatically uses the new DNS provider.
How to Flush Your DNS Cache
After updating your configuration, your device might still hold onto old data. Flushing the cache forces a fresh lookup.
For Windows, open Command Prompt as an administrator and run:
ipconfig /flushdnsTo verify the change, you can check your active servers by running:
ipconfig /allFor macOS, open Terminal and execute the following command (you will need your administrator password):
sudo dscacheutil -flushcache; sudo killall -HUP mDNSResponderTo confirm the active DNS configuration on your Mac, run:
scutil --dnsThe ISP Router Trap and Network Autonomy
While configuring a custom DNS at the router level is the most efficient way to cover an entire household, it exposes a frustrating reality about modern internet service providers. Many ISP-supplied routers now actively lock down DNS fields or silently override custom entries to maintain control over your web traffic. This isn't just a technical annoyance; it is a deliberate strategy to monitor browsing habits and restrict access to certain domains.
If you find that your router-level changes are not taking effect, your ISP is likely intercepting the requests. In these scenarios, configuring the DNS directly on your individual devices - as outlined for Windows and macOS - remains the most reliable workaround. Moving forward, investing in a standalone, third-party router is the best way to guarantee true network autonomy and ensure your privacy settings are actually respected.