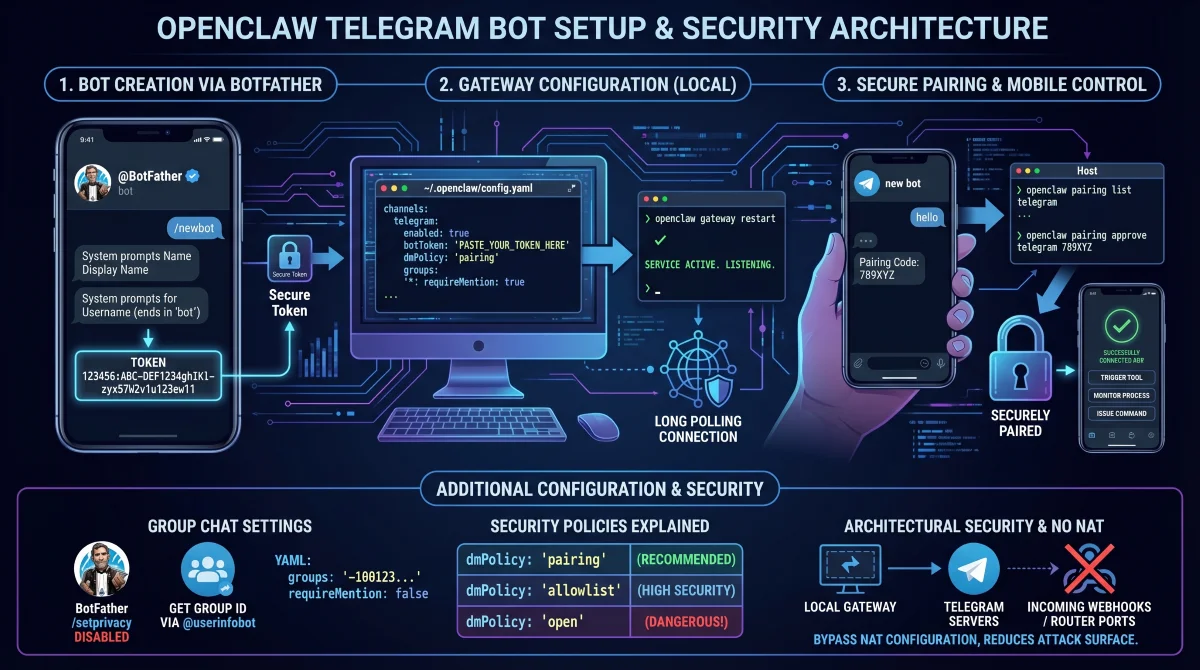
Setting up an OpenClaw Telegram bot allows you to securely control your local AI agent directly from your smartphone, eliminating the need to remain tethered to your desktop terminal. By bridging your local gateway with a dedicated bot, you can issue commands, trigger tools, and monitor background processes remotely. This guide provides the exact configuration steps required to establish a secure, authenticated connection between your local instance and the messaging platform.
Before modifying any configuration files, you must ensure your local environment is fully prepared. The gateway must be actively running and responsive to system checks.
- Verify your installation by running the gateway status command. This ensures the core service is live and ready to accept external channel connections.
- Prepare an active Telegram account. This will be used to interact with the BotFather utility and generate your unique access tokens.
Step 1: Create the Bot via BotFather
The system does not use your personal messaging account to communicate; it requires a dedicated bot entity. You must generate this entity using the official developer tools.
- Search for the @BotFather account within the messaging app and verify the blue checkmark. This guarantees you are interacting with the official developer utility, preventing token theft.
- Send the
/newbotcommand to initiate the creation process. This prompts the system to ask for your desired display name and username. - Choose a username that strictly ends in the word 'bot' (e.g., myopenclawbot). This is a strict platform requirement for all automated accounts.
- Copy the generated alphanumeric token immediately. This string acts as your master password and cannot be retrieved later without completely regenerating it.
Step 2: Configure the OpenClaw Gateway
With your token secured, you must now instruct your local gateway to listen to this specific channel. This requires modifying the primary YAML configuration file.
- Open the configuration file located at
~/.openclaw/config.yamlusing your preferred text editor. This file dictates all channel behaviors and security policies for your agent. - Insert the following channel block, replacing the placeholder with your actual token. This enables the integration and establishes a secure pairing policy by default.
channels:
  telegram:
    enabled: true
    botToken: 'PASTE_YOUR_TOKEN_HERE'
    dmPolicy: 'pairing'
    groups:
      '*':
        requireMention: true
Once the file is saved, you must apply the changes to the active service.
- Restart the service by executing the gateway restart command. This forces the system to read the new YAML file and initialize the long-polling connection.
openclaw gateway restartStep 3: Pair Your Telegram Account
Because the default security policy blocks unknown users, you must explicitly authorize your personal account to interact with the newly created bot.
- Send any initial message (like 'hello') to your bot from your phone. This prompts the system to generate and return a short alphanumeric pairing code.
- Execute the pairing commands on your host machine using the received code. This permanently whitelists your user ID, allowing unrestricted direct messaging.
openclaw pairing list telegram
openclaw pairing approve telegram
Note that pairing codes expire strictly after one hour. If your code times out, simply send another message to generate a fresh string.
Group Chat Configuration and Permissions
Deploying the agent into a shared group chat requires adjusting both platform privacy settings and local configuration rules. By default, bots operate in privacy mode, meaning they only process messages that explicitly mention them.
- Disable privacy mode by sending the
/setprivacy - Retrieve your specific group chat ID by forwarding a message to the @userinfobot utility. This provides the exact negative numerical ID (e.g., -1001234567890) required for your YAML file.
- Update your configuration file to explicitly allowlist this group ID. This prevents unauthorized groups from hijacking your agent's computational resources.
channels:
  telegram:
    groups:
      '-1001234567890':
        requireMention: false
        groupPolicy: 'open'
Security Policies Explained
Understanding the access control parameters is critical to preventing unauthorized execution of commands on your host machine.
| Setting | What it does | Recommended Use |
|---|---|---|
dmPolicy: 'pairing' |
Only explicitly approved users can send direct messages. | Default for personal setups. |
dmPolicy: 'allowlist' |
Restricts access to predefined numerical user IDs. | High-security environments. |
dmPolicy: 'open' |
Allows any user on the platform to interact with the agent. | Strictly not recommended. |
requireMention: false |
The agent processes every single message sent in a group. | Use only in trusted, private groups. |
My Take: Architectural Security and NAT Traversal
The architectural decision to utilize long polling by default is a significant advantage for self-hosted OpenClaw deployments. By having the local gateway reach out to the messaging servers rather than requiring incoming webhooks, users can entirely bypass complex Network Address Translation (NAT) configurations. This means you do not need to open router ports or expose a public IP address, drastically reducing the external attack surface of your home network.
However, this ease of connectivity introduces critical internal security considerations, particularly regarding the direct messaging policies. Leaving the dmPolicy set to open on an agent equipped with file system access or terminal execution capabilities creates a severe vulnerability. Strangers could theoretically trigger tools or read local files. Therefore, adhering to the default pairing mode or utilizing a strict allowlist is absolutely essential for any personal deployment.
Ultimately, integrating this communication channel transforms a static local AI instance into a dynamic, mobile-accessible assistant. For power users, carefully configuring group policies and administrative permissions will unlock advanced multi-agent routing capabilities, allowing seamless collaboration without compromising the host system's integrity.